September 30, 2015

Three Fennel Recipes To Make You A Fennel Lover

People seem to be pretty divided on their opinion of fennel. Those who hate licorice claim they'll never be fennel lovers -- and we must admit some of us used to agree. But after trying these three recipes that not only tame down the anise-y flavor of fennel, but are also just delicious on their own, we bet you'll quickly be converted to Team Fennel!

Fennel Frond Pesto
(makes approximately 1/3 cup pesto)

Fennel-Frond-Pesto


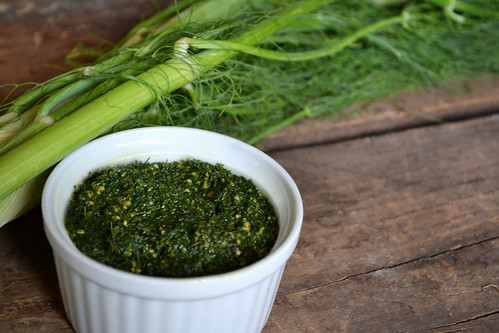
Fennel frond pesto is mild in flavor and a fantastic way to make pesto, especially if you're out of basil. Reserve the bulbs for the two other recipes below and save the stalks for our Root to Stalk Broth.

INGREDIENTS:
1 cup fennel fronds, torn from stalk and roughly chopped
3 tablespoons pistachios
1 garlic clove
3 tablespoons olive oil

DIRECTIONS:
Using a food processor or blender, combine all ingredients until smooth and combined. Enjoy on sandwiches, stirred into your favorite pasta or as a dip.

Roasted Fennel with Parmesan
(serves 2 as a side)

Roasted-Fennel-with-Parmesan

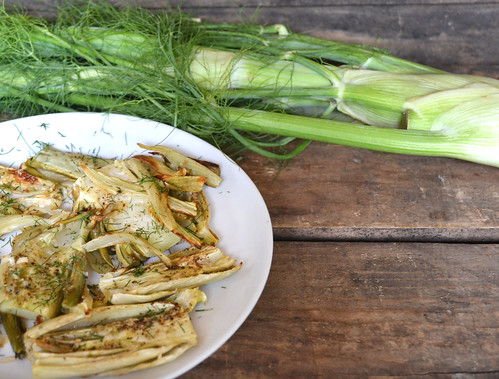
We couldn't believe how good this fennel was once it was sprinkled with Parmesan and roasted. Reserve the fennel fronds for the pesto recipe above and save the stalks for our Root to Stalk Broth.

INGREDIENTS:
1 teaspoon olive oil
1 fennel bulb
2-3 tablespoons Parmesan cheese, grated
salt and pepper to taste
1 teaspoon fennel fronds, minced (optional)

DIRECTIONS:
Preheat the oven to 375 degrees Fahrenheit. Trim about one inch off the bottom of the bulb. Using a mandoline or a very sharp knife, thinly slice the rest of the fennel bulb. Place in a roasting pan or baking sheet and drizzle with olive oil. Toss to coat, then sprinkle Parmesan on top. Season with salt and pepper and roast for 30 min, or until the fennel starts to turn golden. After the fennel is cooked, sprinkle with the fennel fronds and serve!

Fennel Salad with Mint Vinaigrette
(serves 2 as a side)

Fennel-Salad-with-Mint-Vinaigrette

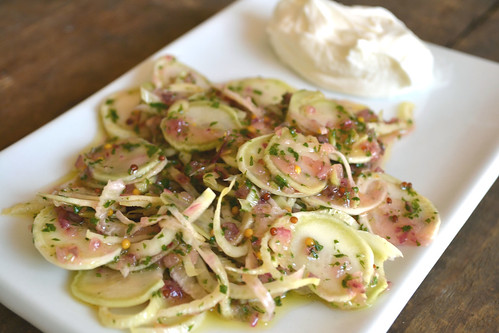
This shaved fennel salad from Simply Recipes is what really helped change our opinion on fennel. The crunch of the fennel paired with the mint vinaigrette and cool yogurt had us dreaming about this salad for days afterward. Reserve the fennel fronds for the pesto recipe at the top and save the stalks for our Root to Stalk Broth.

INGREDIENTS:
1 fennel bulb
1 teaspoon sugar
2 tablespoons lemon juice (approximately 1/2 a lemon)
1/2 teaspoon mustard (we used the Whole Grain Beer Mustard from Pantry House)
large pinch of salt (approximately 1/4 teaspoon salt)
1 tablespoon fresh mint, chopped
2 teaspoons onion, chopped
yogurt for dipping (you could also mix it in the salad too)

DIRECTIONS:
Trim about one inch off the bottom of the fennel bulb. Using a mandoline or a sharp knife, thinly slice the rest of the fennel bulb and place in a bowl. In a jar or a small bowl, make the vinaigrette. Combine the sugar, lemon juice, mustard, salt, mint and onion and shake or stir to combine. Pour over the fennel and stir to combine. Refrigerate the salad for an hour to let the flavors marinate. Serve with the yogurt for dipping and a side of rice if you're looking for a more complete meal.

How To Add Fennel To Your Delivery: CSA members - head on over to our online Farm Stand Market to customize your upcoming delivery. The Market is open from noon on Thursday until 10 am, 2 days before your scheduled delivery day. After you confirm your produce items, click the orange button "Confirm and Continue To Other Farm Products" to add the products to your delivery.

Not part of our farm family? Find out if we deliver to your neighborhood.

September 25, 2015

Root to Stalk Broth

Homemade broth is one of those things that is SO worth it, but can feel like such an effort. We love this root to stalk broth because you can save up all your vegetable scraps in a non-reactive freezer container and make it when you have an extra hour in the kitchen. Our favorite part about this broth is that you get to use the parts of the vegetable you might normally compost, so it's like making delicious broth for free!

Root-to-Stalk-Broth-Scraps

In our broth we made this time, we used leek greens, carrot ends, celery ends, mushroom stems, onion bottoms and leftover halves, thyme and parsley. We also threw in a few chopped up pieces of carrots, zucchini and celery that were starting to go and some garlic cloves for flavor. You can also make this broth with whole celery, carrots, onions and whatever else you have, so if you don't have a stockpile of frozen vegetable scraps, don't feel left out. Here are some other ideas for vegetable scraps you could use depending on the season:

asparagus ends
green bean ends
carrot peels
fennel stalks and bottoms
pea pods
chard and kale stalks
cucumber peels
zucchini peels and ends
dried mushrooms
herb stems such as parsley, oregano, thyme and cilantro

Stay away from using scraps from broccoli, Brussel sprouts, cabbage and cauliflower -- that will make the stock taste overwhelmingly cabbage-y.

Root-to-Stalk-Broth-Pot

Dump your vegetable roots and stalks in a large pot. Fill the pot until the water just about covers the vegetables. (The ratio here is about 4 cups water to 3 cups vegetable scraps). Turn the heat to high and bring to a boil, then turn the heat down and simmer for 40 minutes to an hour. After the cooking time is up, place a colander over another large pot and strain the broth into the new pot. Season with salt and pepper to taste. The broth will keep in the fridge for up to a week, or freeze for several months. This recipe makes approximately one gallon of broth.

Root-to-Stalk-Broth

INGREDIENTS:
(makes approximately one gallon of broth)

3-4 leeks, green parts and ends
1 bunch of carrots, tops and bottoms plus 3 whole carrots (remove large parts of green)
1 zucchini, roughly chopped
1 bunch of celery, tops and bottoms
1 large onion, quartered or 3 onions tops and bottoms
1 handful parsley
1 handful thyme
2 cloves garlic, peeled

DIRECTIONS:
Dump your vegetable roots and stalks in a large pot. Fill the pot until the water just about covers the vegetables. (The ratio here is about 4 cups water to 3 cups vegetable scraps). Turn the heat to high and bring to a boil, then turn the heat down and simmer for 40 minutes to an hour. After the cooking time is up, place a colander over another large pot and strain the broth into the new pot. Season with salt and pepper to taste. The broth will keep in the fridge for up to a week, or freeze for several months.

How To Add Vegetables For Homemade Broth To Your Delivery: CSA members - head on over to our online Farm Stand Market to customize your upcoming delivery. The Market is open from noon on Thursday until 10 am, 2 days before your scheduled delivery day. After you confirm your produce items, click the orange button "Confirm and Continue To Other Farm Products" to add the products to your delivery.

Not part of our farm family? Find out if we deliver to your neighborhood.

September 22, 2015

Eat Real! October Unprocessed Month

october unprocessed 2015
For the sixth year in a row, food writer Andrew Wilder of the blog Eating Rules is challenging us to modify our eating habits for the month of October. The goal? To dump the processed frankenfood many of us eat daily, and replace it with delicious whole foods.

farm fresh customers


We know that many of our customers subscribe to this philosophy already, but we couldn’t be happier to spread the good word and offer our encouragement with recipes, tips, a book giveaway and more. Interested participants should sign the pledge on Wilder's blog and use the social media hashtag #Unprocessed to cheer on other participants, exchange recipes or lament about the hardship of giving up sweeteners and ranch-flavored Doritos.

Wilder said he chose October as the challenge month because it's the gateway to bad eating habits: It starts with Halloween candy, then there's Thanksgiving indulgences, followed by an endless stream of holiday parties.

Homemade Satsuma Soda


The rules are simple, fool-proof and designed to make you successful. The Cliffs Notes version of the rules: whatever you eat must pass "The Kitchen Test." Simply stated, unprocessed food is any food that could be made by a person with reasonable skill in a home kitchen with whole-food ingredients. That doesn't mean you actually have to be the one to make it in your kitchen.

If you are still on the fence about taking the challenge, just know this: Beer and wine pass the kitchen test (wink).


farm fresh to you family


For two generations now (three if you count the kiddos above), we've encouraged local, organic, real-food eating. On our website we have a fantastic array of recipes, we'll be pinning recipes on our October Unprocessed board on Pinterest and sharing your stories here on our blog to help you eat healthier during this challenge, and all year long. Plus, you've got one leg up since you receive farm-fresh, organic produce to your door.

Interested? Here’s the free, October Unprocessed official guide for 2015; whether or not you sign up, we recommend it for a wealth of unprocessed-food info, including how to read food labels and stock your unprocessed pantry.

WHAT YOU CAN DO

1) Take the Pledge.
2) Discuss October Unprocessed with your family.
3) Help your friends be healthier too - Refer-A-Friend to Farm Fresh To You and do the challenge together.
4) Set Your Goals. One week or the whole month (mine is six days a week for a month).
5) Follow our October Unprocessed board on Pinterest.
6) Read Eating Rules for daily updates and tips during the month of October.
7) Share with us here on the blog and on Facebook and use the hashtag #Unprocessed! Send pictures, updates and your favorite recipes. Don't be afraid to share the high and low points. Good luck!

How Will You Participate in October Unprocessed Month? 


End of Season

From the Fields - Thaddeus
 
The tomato vines are haggard and brown. Hiding in their vines is the last of the season’s tomatoes, most of which have deep cracks that show the end of the season is near. Next to them, winter squash plants are beginning to fade, but hidden under their leaves are winter squash gems that are ready to be picked up and put into storage for the fall.

Not far from these fields are the early summer fields that have already been disked. These fields will be left empty until the middle of October when we will plant cover crops and begin our rain dances.
With the summer crops on their way out, the focus has shifted to the fall vegetables. Kales, chards, lettuces and cauliflower transplants have been arriving weekly from the greenhouse. Carrot, radish, beet and bok choy seeds have been sown into fields each week since the beginning of September. The colors and designs created in the fields by these plantings can be more beautiful than the setting sun.

The transition from summer to fall is written all over the fields. Last week, clouds began stacking up above the mountains that surround the farm. Slowly the swirls of grey clouds built into a mass that covered the entire county. The first splash of rain arrived shortly after; it was only enough water to wet the dust and fill the farm with the glorious smell of freshly wetted dirt.

The rain didn’t slow down our farming, but it did refresh the spirit of the farm and left a rainbow overhead as evening came in. Soon all the summer crops will be done, and our fall harvest will be in full swing.

September 14, 2015

Clean Green Juice

Simple and with only a few ingredients, this juice is easy to make and a great way to get some fruits and veggies for the day. Though we used Pippin apples and red kale, any combination of apples and kale will do just fine.
Clean-Green-Juice

INGREDIENTS:
(serves 2)

1 head kale (we used red)
2 apples (we used Pippin)
1 lemon

DIRECTIONS:
Blender/Food Processor Directions: Peel the apples and cut into small chunks. Add them to your blender or food processor and process with some water until smooth. Tear the kale from the stalk and add it to the blender and mix until combined. Cut the lemon in half and squeeze both halves into the blender being careful not to let seeds get in. Mix to combine. Pour into a glass and enjoy!

Juicer Directions: Feed the kale down the chute a few stalks at a time until processed. Cut the apples into manageable pieces and feed them down the chute. Peel the lemon and add that to the machine. Pour into a glass and enjoy!

How To Add Juicing Fruits and Vegetables To Your Delivery: CSA members - head on over to our online Farm Stand Market to customize your upcoming delivery. On the second page of customizations, you’ll find “Produce by the Case” and can stock up if you want a larger batch of produce for juices and smoothies. The Market is open from noon on Thursday until 10 am, 2 days before your scheduled delivery day. After you confirm your produce items, click the orange button "Confirm and Continue To Other Farm Products" to add the products to your delivery.

Not part of our farm family? Find out if we deliver to your neighborhood.

September 10, 2015

Healthy Lunch Ideas for Kids and Adults

Are we the only ones who have a hard time packing lunches? Especially now that school has started, making healthy lunches for our kids and ourselves can be a bit of a challenge. The good news is we have six solutions for you -- three healthy lunches for the kids -- and three for you. Having some convenient containers is handy when making lunches, especially if you make them the night before. We like using mason jars, Bee's Wrap sandwich wraps (available when you customize your box) and other containers that travel and wash well.

Egg Salad Sandwich Lunch
Healthy-Adult-Lunch-Egg-Salad


Check out our egg salad sandwich recipe here. We packed our egg salad separately from the bread and lettuce, then constructed our sandwich once we were ready to eat. Pack some blueberries (or strawberries), almonds, cucumber slices and a plum or apple. The egg salad takes 10-15 minutes to make and holds up well, so you can make it the night before.

Massaged Kale Salad Lunch
Healthy-Adult-Lunch-Kale-Salad


We love kale salads for lunch because they can be dressed and not get soggy by the time you're ready to eat them. Here's our massaged kale salad recipe, and check out another of our favorite kale salads that would also pack well for a lunch. Pair with some berries, nuts and hard-boiled eggs. If you need help perfecting your hard-boiled egg, check out our blog post here.

Rustic Kale Soup Lunch
Healthy-Adult-Lunch-Rustic-Kale-Soup


We can't wait for fall weather, and this rustic kale soup is a perfect way to welcome the cooler weather. Make this soup the night before for dinner, then reap the rewards the next day in the form of an easy, packed lunch! Pack some slices of French bread for dipping in your soup, a handful of nuts and a piece of your favorite fruit.

Snack Pack Lunch
Healthy-Kids-Lunch-Snack-Pack


How many of you pack a lunch for your kids, only to discover they took one bite and didn't touch the rest? We like packing these snack-pack style lunches so they get some variety and might be tempted to try something new. We love using a cookie cutter to make cantaloupe (or other melon) look more tempting to eat, then packed some nuts, their favorite fruit, bell pepper slices, cherry tomatoes and sugar snap peas. Pack along with their favorite yogurt, half a sandwich, or some cheese sticks. Get creative with the options. We like to put four items that we know our kids love, then we give them something new to see if they're feeling adventurous.

PB and J Wrap Lunch
Healthy-Kids-Lunch-PBJ-Wrap


Spread some almond butter and your kid's favorite jelly on a tortilla, and roll it or fold it. Pack with grapes, our homemade fruit leather, cucumber slices and applesauce.

Cheese and Crackers Lunch with Apple Cookies
Healthy-Kids-Lunch-Apple-Cookies


We made these grated apple cookies with whole wheat flour and love putting them in our kid's lunches (and ours) for a treat. Pack with some cheese and crackers, carrots, strawberries, melon and apple juice.

What about you guys? Do you have any favorite go-to lunches to suggest? Let us know in the comments below!

How To Add Lunch Items To Your Delivery: CSA members - head on over to our online Farm Stand Market to customize your upcoming delivery. The Market is open from noon on Thursday until 10 am, 2 days before your scheduled delivery day. After you confirm your produce items, click the orange button "Confirm and Continue To Other Farm Products" to add products like bees wrap and apple sauce to your delivery.

Not part of our farm family? Find out if we deliver to your neighborhood.

Lavender Fields Forever

detail of lavender

Our Capay Organic lavender was harvested, then carefully dried, and we couldn’t be happier with its captivating aroma and eye-catching flowers. We grew a variety called “Grosso” that is known for its long, graceful flower wands and strong yet calming scent. The lovely violet-blue blooms flicker in the summer sunlight and are pretty mesmerizing, especially for the little ones.

We love growing lavender and hope that you and your family will enjoy the dried bouquet for months to come. Remember to add them to your next delivery when you customize your box.


How To Add Dried Lavender To Your Delivery: CSA members - head on over to our online Farm Stand Market to customize your upcoming delivery. The Market is open from noon on Thursday until 10 am, 2 days before your scheduled delivery day. After you confirm your produce items, click the orange button "Confirm and Continue To Other Farm Products" to add lavender to your delivery.

capay organic lavender


Not part of our farm family? Find out if we deliver to your neighborhood.

September 7, 2015

Perfect Planting Schedule

From the Fields - Thaddeus

Matching when crops harvest to the seasons is something I have not yet perfected. One would think that given the number of trips the farm has made around the sun with me making the planting schedules, I would have nailed it by now. The result we want sounds simple enough: just as the harvest of the summer crops that were planted in the spring start to slow down, we want the fall vegetables planted in the summer to be ready to harvest.

Every year there is an annoying gap – summer tomatoes, peppers, melons and eggplant are slowing down and the chards, kales, carrots and mixed vegetables are not big enough. Next year, I will nail it.
Lucky for all of you, our farm works with other like-minded farms in your area to fill these little gaps so you always get the best selection of local produce. Lucky for us too – you wouldn’t like me filling half your box with eggplant this week! As much as I love eggplant, I don’t know what I would do with that much of it.

There is always the length of the season that is hard to predict. Summer harvest started a couple of weeks earlier than it has in the past years, which means it ends a couple of weeks sooner. I am also realizing that I need to start direct seeding some of my vegetables into the ground earlier, a month earlier. The notes are going into my book, and they will find their way to next year’s planting schedule. Ricardo is going to be a little surprised by how early we will want the ground ready, but he will adapt.

I am excited for the fall. The evenings are cool and crisp with the end of the summer. The summer crops and local oak trees look tired and ready to retire for the season. The cool weather is just what the fall vegetables have been hoping for. The close of another season is just around the corner.

September 4, 2015

Sunrise Juice

Sunrise-Juice-Ingredients

Packed with Vitamin C, this sunrise juice is the perfect juice for when you're feeling under the weather, need a little pick-me-up, or want a simple, fresh juice to make. We love combining carrots and oranges in juices not only because of the vibrant color, but they're both slightly sweet with a little bit of tang. Add in ginger if you want a little bit of kick to your juice or are fighting a cold.

Sunrise-Juice-Flickr

INGREDIENTS:
(serves 2)

1 bunch carrots, green leafy parts removed
2 oranges, peeled
ginger (optional)


DIRECTIONS:
Blender/Food Processor Directions: Peel the carrots and cut into small chunks. Add them to your blender or food processor and process with some water until smooth. Add in the oranges and mix until combined. Taste and add grated ginger if desired. Pour into a glass and enjoy!

Juicer Directions: Feed the peeled oranges down the chute one at a time until processed. Add the carrots, a few at a time, until processed. Taste and add a knob of ginger down the chute if desired. Pour into a glass and enjoy!

Sunrise-Juice-Aerial


How To Add Juicing Fruits and Vegetables To Your Delivery: CSA members - head on over to our online Farm Stand Market to customize your upcoming delivery. On the second page of customizations, you’ll find “Produce by the Case” and can stock up if you want a larger batch of produce for juices and smoothies. The Market is open from noon on Thursday until 10 am, 2 days before your scheduled delivery day. After you confirm your produce items, click the orange button "Confirm and Continue To Other Farm Products" to add the products to your delivery.

Not part of our farm family? Find out if we deliver to your neighborhood.

September 3, 2015

How To Cook (And Eat) An Artichoke

Artichoke-How-To

Don't be intimidated by these beautiful vegetables! We can only imagine if you are trying to cook them for the first time that it can be a little unnerving. Well don't fret - we have step-by-step instructions (with photos) to show you how to prepare, cook and eat your artichokes. We promise they're worth a try!

Cut-Artichokes-How-To

Trim about one inch off the tip of the artichoke as shown above. While you can technically eat the stem of the artichoke, it's a little more stringy to eat than the rest of the artichoke, so we recommend trimming the stem to about an inch.

Artichoke-Steam-How-To

Place a steaming basket into a large pot and fill with water until it just touches the bottom of the steamer. Put the artichokes on top of the steaming basket and cover with a lid. (Depending on how large your pot is, you might need to replace the water halfway through cooking).

Artichoke-How-To-Leaves

Place the pot on the stove and bring to a boil, then reduce to a simmer. Steam for 40 minutes, or until the outer leaves EASILY pull off from the artichoke. Cooking time can vary greatly depending on the size of your artichokes, your pot, and how high off the water your steaming basket is. You may need more or less than 40 minutes to finish the job.

Artichoke-Teeth-Scrape

To eat the artichokes, peel off a leaf and place the lighter-colored end in your mouth between your top and bottom teeth, flesh side down. Gently clamp down and scrape the soft, pulpy delicious part of the artichoke leaf off with your teeth. You can choose to dip your artichoke leaves in melted butter or mayonnaise, but they're also delicious plain.

Artichoke-How-To-Eaten

As you get closer to the center of the artichoke, the leaves will get smaller and there won't be any flesh left for you to eat.

Artichoke-Fuzzy-Heart

Keep pulling the leaves until you get to a fuzzy middle (see above). Pluck out the fuzzy part, then carefully scrape the thin layer of grey with a knife or spoon.

Artichoke-Heart-How-To

The part leftover is the heart! Eat this part dipped in melted butter or mayonnaise and enjoy your hard-earned artichoke work.


How To Add Artichokes To Your Delivery: CSA members - head on over to our online Farm Stand Market to customize your upcoming delivery. On the first page of customizations, scroll down until you see artichokes. Add them to your box along with any other produce you need. The Market is open from noon on Thursday until 10 am, 2 days before your scheduled delivery day. After you confirm your produce items, click the orange button "Confirm and Continue To Other Farm Products" to add the products to your delivery.

Not part of our farm family? Find out if we deliver to your neighborhood.

September 1, 2015

The Revival of Shrubs & Book Giveaway

Homemade_Plum_Shrub_Cocktail

Have you ever tried a shrub? And no, I’m not referring to the short, bush-like plant under your window sill. The shrub I’m referring to is tangy, sweet, and delightfully refreshing, an invigorating blend of fruit, sugar and vinegar. These trend-setting cocktails and sophisticated sodas were popular during the Colonial Era to preserve fruit long after harvest. Once crafted, the shrub can be mixed with water, sparkling water, sparkling wine or something stronger like rum to offer wonderful refreshment.

Shrub Cover
Shrubs Book Cover (Photo by Jennifer Hess)

Last week, we shared about Happy Girl Kitchen’s artisanal shrubs. This week we're showing you how easy it is to make your own with a little help from Michael Dietsch, author of the book Shrubs, and a few of his delicious sweet & savory shrub recipes. We will have you mixing and macerating like a pro!

Dietsch has done a great job of breaking the book into sections, beginning with a well-researched tour through the colorful beginnings of this captivating drink, charting its journey as a flavored soft drink tablet, to its heroic role in warding off scurvy. However, the popularity of the drink had pretty much languished until 2004 when The Wall Street Journal spoke about the intriguing nature of shrub cocktails and promoted the handful of boutique firms dedicated to making small batch shrubs.

Michael Dietsch (Photo by Jennifer Hess)

Today, the shrub is experiencing an urban craft revival and we couldn't be happier. We hope these recipes get your creative fruit juices flowing and that you mix up a batch of shrubs for your next dinner party. Not only will your guests love trying the latest trend-setting soda or cocktail, it makes for a great conversation starter.


We're so happy to have a copy of this awesome
book to give away to one of you!
Here's How To Enter -

To win a copy of Shrubs, simply leave a comment below answering this question by Tuesday, September 15, 2015 (one entry per person please).

What is your go-to mocktail/cocktail?

No purchase required. Limit one entry per person, please. Entries will close on Tuesday, September 15, 2015 at 1:00 pm. Winner is chosen by Random Number Generator and announced on our blog on Tuesday, September 15, 2015.

 Thank you for all the delicious comments! 
The winner chosen at random is Melinda and Mary who said:

Melinda: My new cocktail obsession is the Prohibition Era "Bees Knees". A divine blend of Gin, honey simple syrup and lemon juice. Perfectly balanced sweet & sour, utterly refreshing and I 'almost' feel downright healthy drinking it. Taking the time to make my own syrup with a local Buckwheat honey elevates a great drink to perfection! 
Mary: I love to crush fresh basil and mint with a mortar and pestle. Add simple syrup, a splash of ginger beer, soda water, and a splash of whiskey and you have yourself an herbal mule.


Apple-Cinnamon Shrub
Cinnamon-Apple Shrub (Photo by Jennifer Hess)
CINNAMON-APPLE SHRUB
This shrub is a simple evocation of fall, with apples, cider vinegar, and cinnamon. I used turbinado sugar here because it’s a little richer than white sugar and I felt it would add a caramel note to the shrub.
 

If you have an urge to push this one closer to a classic apple-pie flavor, a little nutmeg in addition to the cinnamon wouldn’t hurt. I would crack a whole nutmeg in half and add half a nutmeg alongside the cinnamon.

INGREDIENTS
3 medium apples, quartered
(no need to core or seed them) 

1 cup apple cider vinegar 
1⁄2 cup turbinado sugar 
2 cinnamon sticks

DIRECTIONS

1) Using a box grater or a food processor, shred apples.
 

2) Add shredded apples, cider vinegar, sugar, and cinnamon to a nonreactive container. Cover and leave in cool place on the countertop for up to 2 days.

3) After 2 days, place a fine-mesh strainer over a bowl. Strain apple mixture. Squeeze or press apple mixture to remove any remaining liquid.

4) Pour liquid into clean mason jar or glass bottle. Add lid or cap and then shake well to combine. Place in refrigerator.

5) Discard solids.

6) Shrub will keep for up to 1 year.

cucumber_shrub
Cucumber Shrub (Photo by Jennifer Hess)

CUCUMBER SHRUBS
Perfect for pairing with gin. Splash a teaspoonful into your next martini for a subtle addition that will make your martini taste extra fantastic. I used a blend of white wine and apple cider vinegars here because I didn’t want the delicate flavor of the cucumbers overwhelmed by the cider vinegar. The salt is here because I wanted this shrub to taste a little more savory than the typical fruit shrub.

INGREDIENTS
2 large cucumbers
1⁄2 cup white wine vinegar
1⁄2 cup apple cider vinegar
1⁄2 cup sugar
1 teaspoon kosher salt

DIRECTIONS
1) Add cucumbers to the blender. Blend till pureed.

2) Press puree through a fine-mesh strainer into a medium bowl.
Add cucumber juice, both vinegars, sugar, and kosher salt to a jar or bottle. Shake very well to combine and refrigerate till cold.

Mix with water, sparkling water, sparkling wine or something like rum for a little extra kick. Typically you would use a 1:4 ratio when mixing a shrub mocktail/cocktail, however, taste as you go to find your preferred ratio.

***
Reprinted with permission from Shrubs written by Michael Dietsch and photographed by Jennifer Hess (Countryman Press, © 2014)